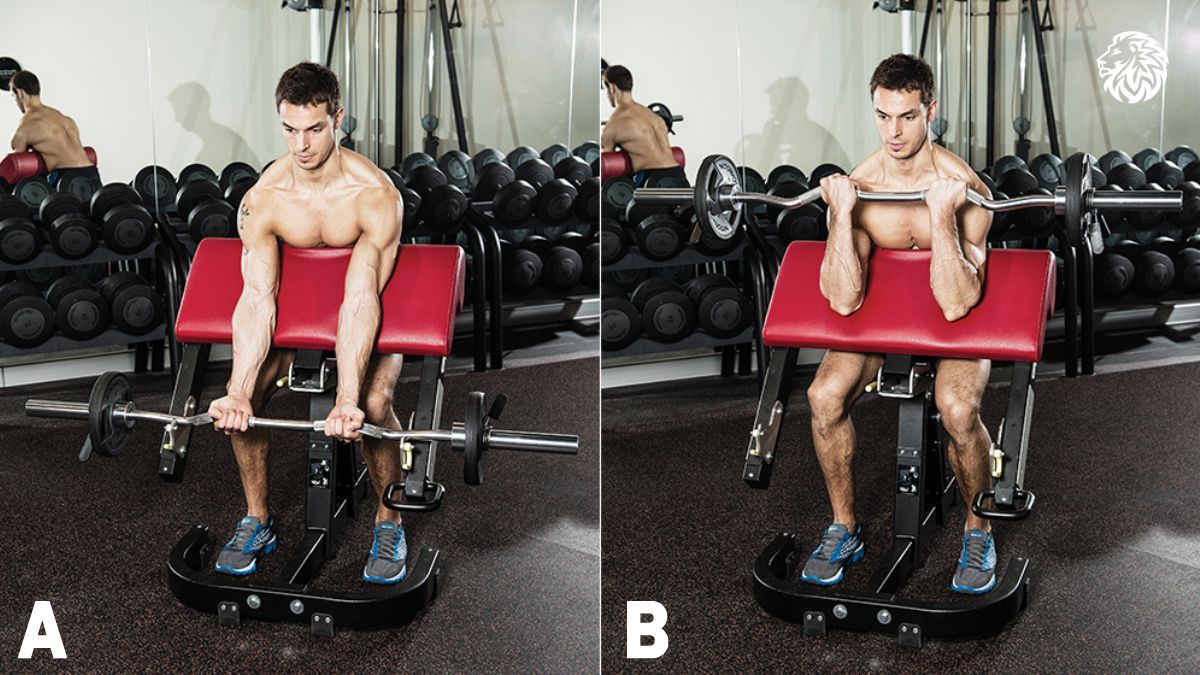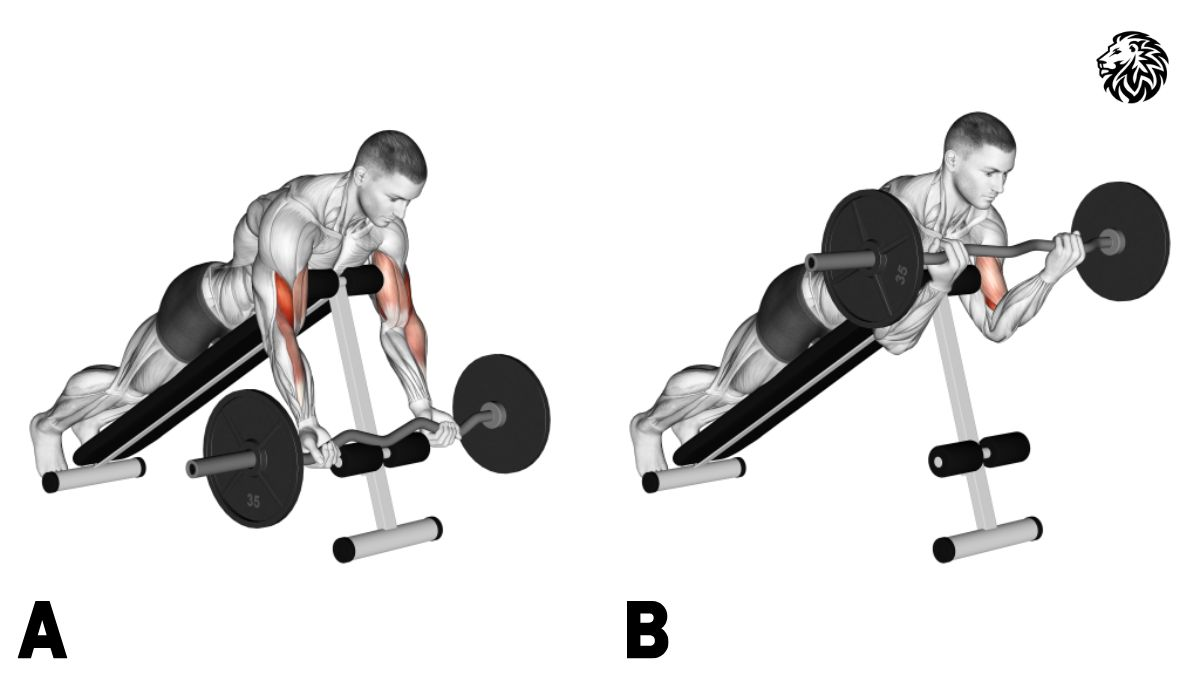
The Spider Curl is a focused biceps exercise that emphasizes strict form and constant tension. Lifters often use it to isolate the biceps and limit help from the shoulders or lower body. You perform the Spider Curl with your chest supported on an incline bench, which keeps your arms hanging straight down and places your biceps at a mechanical disadvantage. That setup forces the muscle to work harder through the full range of motion.
Many lifters add Spider Curls to arm days to improve peak contraction and muscle control. The exercise works well for beginners who want better form awareness and for advanced lifters who want to refine biceps shape. Because the movement stays controlled, it also reduces momentum and encourages better mind-to-muscle connection.
Exercise Instructions: How to Do the Spider Curl
Follow these steps to perform the Spider Curl with proper form and consistent tension.
- Set an adjustable bench to a 45- to 60-degree incline. Position the bench so the seat faces away from you.
- Lie chest-down against the bench. Press your chest firmly into the pad and keep your feet planted on the floor for balance.
- Hold a dumbbell in each hand or use a straight bar or EZ-bar. Let your arms hang straight down with your palms facing forward.
- Engage your core and pull your shoulders down and back. Keep your upper arms vertical throughout the movement.
- Begin the Spider Curl by bending your elbows and curling the weight upward. Focus on squeezing your biceps as the weight rises.
- Lift until your elbows reach full flexion or the weight approaches shoulder level, depending on your mobility.
- Pause briefly at the top and contract your biceps.
- Lower the weight slowly back to the starting position. Maintain control and keep tension on the muscle.
- Repeat for the desired number of reps without swinging or shifting your body.
Muscles Targeted by the Spider Curl
The Spider Curl mainly targets the biceps brachii, which includes both the long head and the short head. The bench angle and arm position place extra emphasis on the biceps peak.
Secondary muscles support the movement and help stabilize the arms.
- Biceps brachii (primary)
- Brachialis
- Brachioradialis
- Forearm flexors
Because your chest stays supported, the shoulders and lower back contribute very little. That makes the Spider Curl an effective isolation movement.
Why the Spider Curl Is Important
The Spider Curl improves biceps activation by removing momentum and limiting body movement. Many standing curl variations allow lifters to cheat with hip drive or shoulder involvement. The Spider Curl eliminates those options.
This exercise also helps improve muscle control and contraction quality. When you pause at the top of each rep, you reinforce proper engagement and improve time under tension. Over time, that can lead to better muscle definition and stronger elbow flexion.
Spider Curls also fit well into hypertrophy-focused programs. They pair well with heavier compound pulls earlier in a workout. By the time you reach Spider Curls, your biceps already feel fatigued, which increases the challenge even with moderate weights.
Tips and Things to Avoid With the Spider Curl
Use these tips to keep your Spider Curls effective and safe.
- Use lighter weight than you would for standing curls.
- Keep your chest pressed firmly into the bench at all times.
- Move through a slow and controlled tempo.
- Focus on squeezing the biceps, especially at the top of the curl.
- Keep your elbows fixed and avoid letting them drift forward.
Avoid these common mistakes.
- Do not swing the weights or rush the reps.
- Do not let your shoulders roll forward at the bottom.
- Avoid locking out your elbows aggressively.
- Do not shorten the range of motion to lift heavier weight.
- Avoid arching your lower back or lifting your chest off the bench.
Reps and Sets for the Spider Curl
Use the following table as a general guide. Adjust volume based on experience and training goals.
| Goal | Sets | Reps | Rest |
|---|---|---|---|
| Muscle endurance | 2–3 | 12–15 | 45–60 seconds |
| Muscle growth | 3–4 | 8–12 | 60–90 seconds |
| Strength focus | 4–5 | 6–8 | 90 seconds |
Other Exercises to Use With the Spider Curl
Pairing the Spider Curl with complementary exercises can help build balanced arm strength.
- Incline Dumbbell Curl
- Preacher Curl
- Cable Curl
- Hammer Curl
- Chin-Ups
- Concentration Curl
Use heavier compound pulls earlier in your session, then finish with Spider Curls to isolate the biceps.
Final Thoughts on the Spider Curl
The Spider Curl stands out as a reliable biceps isolation exercise that rewards patience and control. It encourages strict form, strong contractions, and steady progress. You do not need heavy weight to benefit from this movement. Focus on tempo, positioning, and muscle engagement.
Adding Spider Curls to your routine can improve biceps shape and strength while reinforcing proper curling mechanics. Whether you train at home or in a gym, this exercise fits easily into most arm-focused workouts.
Frequently Asked Questions About the Spider Curl
Is the Spider Curl better than regular curls?
The Spider Curl offers more isolation and reduces momentum. Regular curls allow heavier loads, but Spider Curls improve control and contraction.
Can beginners do Spider Curls?
Yes. Beginners benefit from the strict setup, which helps reinforce proper form and elbow positioning.
What equipment works best for Spider Curls?
Dumbbells work well for unilateral control. EZ-bars reduce wrist strain and allow slightly heavier loads.
How often should I do Spider Curls?
Most lifters use Spider Curls once or twice per week as part of an arm or pull workout.
Should I pause at the top of each rep?
A brief pause increases tension and improves muscle engagement. Keep it controlled rather than rushed.